HOME Home About Subscribe Features FAQ Beauty Fashion Lifestyle
Showing posts with label Tutorial. Show all posts

Tuesday, June 17, 2014

Soft Everyday Makeup Tutorial


Hi there, long time no see!
I am back, and this time with my everyday makeup look. I like to switch up my makeup a bit every day so I don't fall into a rut, but sometimes there are those days when I just need a tried-and-true look, be it for lack of time, or maybe because I am not particularly feeling my best. On those days I know to go for some products that work like a charm. I love this routine because it is appropriate for multiple purposes, and it isn't too bold or difficult to pull off. Here is my routine:


1. First of all, I apply my foundation and concealer. I am currently loving the Tarte Amazonian Clay Foundation: it is super buildable and provides awesome coverage, which is great for those days when I'm in a pinch. Then I apply my Nars Radiant Creamy Concealer in Ginger under my eye area, and on all my spots and blemishes (specially that pesky little guy on my right cheek! Ugh!). Under my eyes, I do a little triangle shape all the way down to my cheekbones, and blend with my finger. These two products blend seamlessly, but now I am in desperate need of some color on my face.


2. Now come the powders: I am a lifetime loyal fan of the M.A.C. Studio Fix Powder. It mattifies my complexion like no other I've ever tried, and when you produce as much oil as I do, that's exactly what floats your boat. Next I put on my Milani Baked Blush in Berry Amore, because I'm wanting to bring lots of life to my face and I really don't have time to apply a bronzer. I love how it has a very subtle shimmer which also slightly highlights the face. 


3. Time to do my eyes, which is one of my favorite parts of doing my makeup. First off, I curl those eyelashes so they stop resembling a donkey's. Then I reach for a palette where I can find all the colors I'll need without having to look around for more, and that is the Stila In The Light Palette. I start with the color "Bare" right under my brow bone. Look how much more awake my eyes look just by applying some light under the eyebrows!


4. Let's add some color shall we? I'm sticking with matte finishes here, because like I said, this is an everyday look that I want to make work for most situations. I start with "Bliss" all over my eyelid. Then I apply some "Sunset" on the crease, which complements "Bliss" perfectly and adds depth and definition to the eyes. And finally, I apply a bit of "Sandstone" on my outer v, smoking my eyes a little and giving them an extra "something something". This is such a gorgeous deep brown, it reminds me of a rich chocolate milkshake. 


5. Or course this look wouldn't be complete without some good ol' mascara. I find myself usually reaching for Lancome Hypnose Drama Instant Full Body Volume Mascara (what a mouthful!). It does exactly what it says: it adds that drama that we always want our eyes to portray. And this bad boy doesn't smudge at all, and reliability is something we want in a mascara, people.


6. Alright, we are nearly finished! The last step is to apply a gorgeous shade of lipstick that complements the whole look and voilĂ ! In this case my choice is CoverGril LipPerfection Lipstick in 260 Heavenly. It isn't too girly or too bold, it is just right and appropriate. This lipstick was actually a gift from the gorgeous Martyna from Spoolish, as part of a blogger swap we did a couple of months ago, and I love it a lot. I'll dedicate a whole post to the swap sometime this week, so keep your eyes peeled for that if you're interested. Girl really knew the way to my heart! 

This is it! We are ready to walk out the door in 15 minutes, looking pretty. I hope you liked this look, and let me know if you have tried any of these products, and what are those that you reach for over and over when you are in a pinch?

Tuesday, June 3, 2014

Full Coverage Tips For Blemished Skin


I was thinking that today we could play a fun little game: raise your hand if you enjoy breakouts...!  Come on....  Don't be shy...  Raise it...  Raiiiiise it....!!!  No? No one?
Ok fine, it seems no one likes breakouts. BUT life is funny like that and chances are you've had them or might even have one right now. What's that!? You do!? Yay, me too! We can be zit buddies today (or something less lame!).

Like any good friend, though, I am going to show you some tips and tricks I've picked up over the years to mask the little bastards. Yes, we all are beautiful, what's inside is what matters blah blah blah but let's face it: that doesn't mean that we want to walk around with a third eye. (Or maybe you do, I'm not here to judge!).

So first things first:

1. Make sure you clean your face properly: get into those pores and take out all the gunk they accumulate. 

2. Now start off with a good primer. There is no point in covering up a zit perfectly, only to have your makeup be gone half an hour later. On my last post  I also suggested using a makeup-setting spray, which is just as effective as a primer and gives a wonderful cooling sensation for when the temperatures are high. 

3. Use a full-coverage foundation. This DOES NOT mean putting eight pounds of it on your face! (which would actually be counterproductive). Start with a thin layer and build it up until you get your desired coverage.

4. Concealer! This is probably one of the most key parts of this tutorial, as what this is all about is concealing! So find a good one, and conceal the heck out of those little buggers. 

5. Another key aspect for me is to take as much focus away as possible from the culprits. So what I'll do is I will put on a bold lipstick and really play up my eyes. (Black eyeliner can do wonders for this!). There is a fine line, however, between having eyes and lips that steal the focus away from the rest of your face, and looking like a "lady of the night", if ya' know what I mean!  Oh, and if your breakouts happen to be around the cheek area, like mine, go easy on the blush. Again, we are trying not to bring attention to them!

6. Finally, don't take yourself too seriously. I used to get so miserable whenever I saw another pimple making its unwanted appearance, and I realized I was letting them ruin my mood way too often. Yes, zits still annoy me, but they don't control me anymore. And if you're like most women, you won't be able to escape them either. Kind of like your child when you are trying to go to the toilet in peace. So do what you'd do in those cases: ignore them and it will be over before you know it.


The photos above are the final look (non-photoshopped), and here are the products used for this tutorial:


Amazonian Clay 12-Hour Full Coverage Foundation in Medium Sand
NARS Radiant Creamy Concealer in Ginger
M.A.C. Studio Fix Pressed Powder in NC42
Maybelline Color Sensational Vivids Lipstick in Shocking Coral
Tarte Lights Camera Lashes Mascara
Maybelline Dream Bouncy Blush in Pink Plum


Wednesday, February 5, 2014

Sean's Wednesdays v.4: Mini Caramel Brownie Cakes

Hi again, everyone!

Today I want to tempt all your pallets with this scrumptious dessert recipe. Anyone can make brownies, yes, but it's little tricks and touches that take a brownie from "good" to "Holy crap, when did I eat 5 of these!!?". And this, my friends, is the recipe that gets the job done.


To make approximately 12 brownies you will need:
- 350gr dark chocolate (about 1 1/2 big bars). I personally used medium-dark as I like it better.
- 1 1/4 cup all purpose flour.
- 5 tablespoons cocoa powder.
- 1 3/4 cup brown sugar.
- 6 eggs (4 full eggs and 2 yolks)
- 1 cup butter
- 1 teaspoon vanilla extract
- Caramel spread  (optional -- but highly recommended!)

NOTE: I made my mini cakes in little muffin moulds to give them more of a "cake" feel. I had some leftover batter that I then put into a little cake mould. However, feel free to use whatever baking dish or mould you have on hand!

Firstly, put the chocolate and the butter together in a bowl. Put the bowl inside a saucepan of boiling water. Stir until melted.

Next, turn the heat off. Add the brown sugar and blend everything together. Now remove the bowl from the element and add your vanilla, eggs, and egg yolks while stirring softly.


Pour your mixture into the mould, but only half. Put a dollop of the caramel spread on top of the mixture, and then top off each muffin mould.


Bake in the oven at 350Âş F (or 180Âş C) for approximately half an hour. Check regularly, though, to ensure they aren't burning!


When ready, take them out and let them cool.
That's it, enjoy!

Hope you liked this very 'sweet' rendition of Sean's Wednesdays. Stay tuned!


 photo Footer_zps0751fb70.jpg

Wednesday, January 15, 2014

Sean's Wednesdays v.1: Chocolate Rocks

I am very, very excited to present to you my new series: Sean's Wednesdays!

I have mentioned before that Sean is an excellent cook: he loves creating yummy dishes, scrumptious desserts and sophisticated cocktails. He truly is a kitchen whiz (or maybe it just seems to me that way because I am hopeless at it, but stay with me). Imagine my delight when last week, while sharing a pizza, he informs me that he would love to be a contributor to my blog, with a weekly food and drink segment! My own hubby wants to be a part of my blog! I am so proud!

So without further ado, let's welcome Sean, a great cook and even better man. Every Wednesday he will share something delicious here on the blog for your tasting pleasure, starting today with this awesome cocktail recipe.

Hi, guys, Sean here.
First off, this is a cocktail that is so versatile and easy to throw together! It's shaken in this demonstration, but you can also just build it in a tall glass.

First you will need:

- Ice
- Bailey's
- Rum Cream (Can be Kahlua or Frangelico or another Irish cream of your choice)
- Milk
- Chocolate sauce
- Liquid Honey
- Cocktail shaker (or any substitute)


First, take your shaker and add ice. Then pour about 30 - 40 mls (1 - 1.3 oz) of the Rum cream followed by 45 - 60mls (1.5 - 2 oz) of the Bailey's. Add honey and shake for a few minutes to chill the mix.


Take your glass and gently add chocolate sauce to the inside of the rim of the glass, rotating it slowly. Now pour the mixture from the shaker and add milk to where the chocolate circles the top of the glass.


Give it a little stir to finish it off. Feel free to add whipped cream or more chocolate sauce, or why not sprinkle some chocolate chips on top!


Serve this on a hot Summer afternoon or grab a sneaky mug of it at brunch. A great hit for entertaining is serving it in a large pitcher and share with some friends. And if it is cold where you are, you can try a hot version too! (just hit up the milk, and it's done!).

I hope you enjoyed this first Sean's Wednesday and feel free to suggest any of your favorite drinks and recipes for upcoming posts!


 photo Footer_zps0751fb70.jpg

Tuesday, January 7, 2014

Homemade Scented Candles

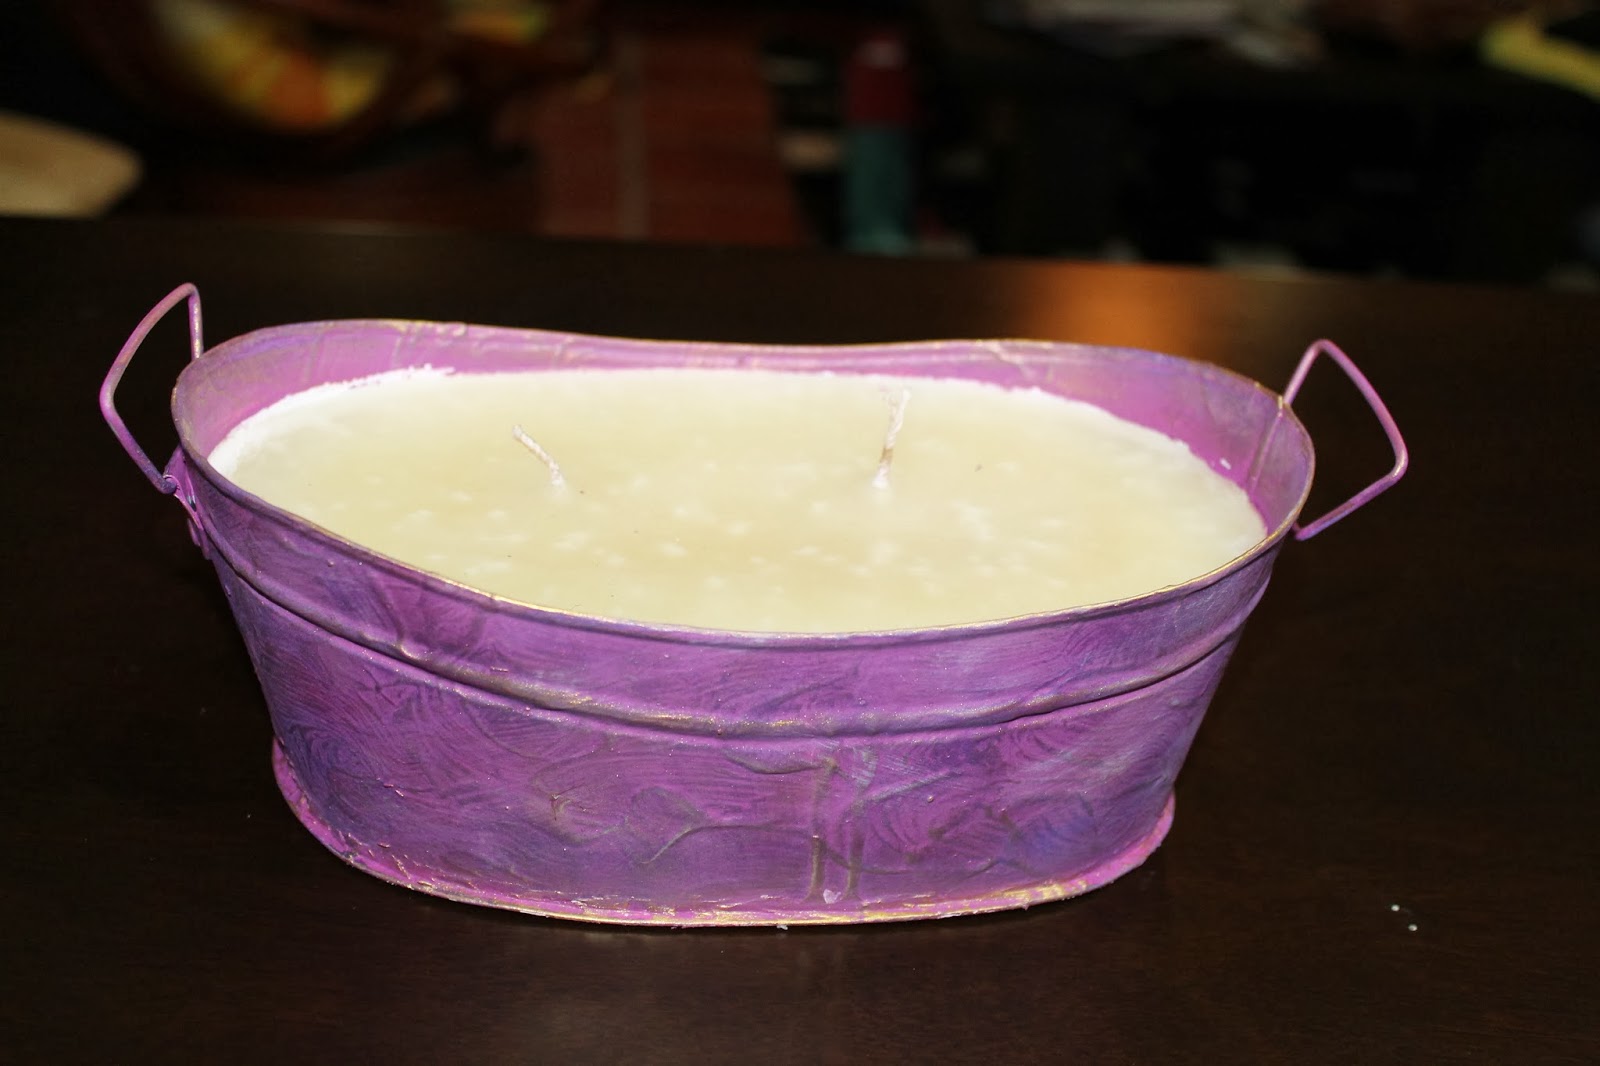
For Christmas, my very DIY-oriented mom gave away some stunning scented candles to friends and family. I thought they looked stunning, and since I am pretty much obsessed with scented candles, I had to ask her to teach me. As it turns out, it is not at all difficult. To make them, you will need:
  • Tin or pot
  • Liquid paraffin (the amount depends on how big your tin/pot is)
  • The fragrance or essential oil of your preference (Lavender, Cinnamon, Vanilla, Lemongrass... whatever you want your candle to smell like)
  • Poppy paint (optional)
  • White paint and any other color you wish to use
  • A strong cotton cord or string for the wicks
The first thing you'll need to do is paint your whole tin white, to even out the surface and to make the rest of the paint look brighter and stick better to the tin. At this point, you can choose to make some designs with poppy paint in order to give it more texture. Another technique she taught me for texture (shown in the picture below) is to dip your brush in the white paint and then wipe it until the brush is almost dry. Then paint the tin with several, irregular strokes in different shapes until it is all covered.


Once it has fully dried, it's time to create the actual candle. First, you'll need to make sure that your wicks stand straight once the candle is finished: what I do is stick the cords to the bottom of the tin with a little ball of play-doh, and I hold them up, looping the ends (which will become the wicks) around a pencil or some long stick, ensuring that the wicks stay in place. For big tins, I like making three wicks for a better throw.

Now, pour the paraffin and the fragrance oil into the tin. Let the paraffin solidify over a good 24 hours. 
Once the paraffin is solid, trim the wicks to your desired length (1/2 inch or so is a good standard).


Now it's time to get creative: paint your tin however you want: personalize it with a nice message for someone, comforting words (like my mom did), or even write your favorite quote on it. The sky is the limit here!


Love, Peace, Faith... encouraging words and hearts make this a gorgeous candle


And then there's this one, made for me and Sean with our wedding details on it:


Everyone who received these candles for Christmas was absolutely delighted. But since the Christmas season is over now, why not make some to put around in your house? They will certainly add a lot of character and are quite the conversation starters. 


Wednesday, December 4, 2013

Homemade Mickey Mouse Chocolate Chip Cookies

'Tis the season to eat yummy!


Baking cookies is one of those things that I hardly ever do, but when I do do it I love it, and end up wondering why I don't do it a lot more often. Of course, help from my fiancé is pretty much required, as God knows how they would turn out if he didn't (oh look at that, I know too: not too good!).

He is a second grade teacher, and last week we were discussing what he wanted to give his students as a little treat for the beginning of the holidays. I mentioned that baking some cookies would be nice, and that is exactly what we set out to do. I started researching recipes, and was finally inspired by these from Bakerella. They include pecans (which I hate) and sprinkles (which we didn't have at the time), so we didn't add those. We also substituted the chocolate wafers she used in that recipe for regular chocolate chips.

We made enough for his class and of course for us, and even though they didn't look particularly stunning, they tasted pretty darn good, so I was satisfied.

The ingredients you will need to make 24 of these are:

  • 1 1/2 cups flour
  • 1 tsp baking soda
  • 3/4 tsp salt
  • 1 cup softened butter
  • 3/4 cup sugar
  • 1 cup brown sugar
  • 2 tsp vanilla
  • 2 eggs
  • Whatever additions you want to add (license to get creative here!). I only used m&m's and chocolate chips. You can use whatever you have handy.

First of all, mix the flour with the baking soda and the salt. Take the butter and the sugars and cream them together:


When the texture is fluffy, add the eggs and the vanilla, and combine. Take the flour, baking soda and salt mixture and add it. When combined, add your toppings:


Let it chill for about half an hour. Preheat your oven to 350 ÂşF (or 180 ÂşC). Scoop the cookies onto baking paper, and let them bake for around 15 minutes (but be careful! some ovens take shorter, like mine... I got a little distracted and almost burned them, so just make sure you are keeping an eye on them!).


After making the first batch, we realized we have a Mickey-shaped cookie cutter lying around (goes to show how often I bake cookies!) that we got when we went to Disneyland last year. Tommy was so excited to eat the "Mickey cookies"! They could have tasted awful and they still would have been a hit with him. Oh, and Sean informed me that his students loved them too, so I am definitely calling them a success!

***The reason there weren't too many m&m's may or may not be because I had a mouthful or two before baking***

All in all it was quite the nice Sunday afternoon activity. I was left with the desire to keep baking fun little treats during the Christmas time. It just feels like that is what super moms do, you know? I have the impression that all the great moms out there are great at baking (just me?) and I really want to incorporate that into our lives. Who knows? maybe I'll become the kind of mom that when my kid brings a friend over I just come out with baked goodies for them... I think that makes for great memories. And, well, if the cookies don't turn out that good, it makes for great stories, so what's there to lose, right?


Monday, December 2, 2013

DIY Advent Calendar

December has officially started, and with it the holiday season has now begun in full force. I love seeing the streets fill with lights, seeing Christmas trees everywhere I go, and even listening to carols. Ever since I was little, the holidays have filled me with such joy, and I get all giddy with the excitement and the good energy this time of the year brings. 25 years old and I still enjoy Christmas like the next kid. My 3-year-old is now a lot more aware of the festivities, too, and therefore excited about what's to come, so I set out to find something special and meaningful, something to start creating magical memories for him about this time of the year.

That's when I suddenly started seeing hundreds of DIY advent calendars popping up on my social media feeds, such as herehere and here. Even though I am not very crafty, I was adamant that I wanted to recreate them and make my own calendar for him. It is definitely not as pretty as the ones you'd find at the store, but there was something so special about sitting one afternoon with Sean and making this for our kid. It made me really proud when it was finished, and I couldn't wait for Tommy to start opening the little pockets (most of them are little chocolates or candy, some are other small surprises).


Making it was easier than I had envisioned, and it only required some wrapping paper, some sort of cord (twine is great, but if like me, you only have wool available, that works too!), and somewhere to hang the pockets from (we just went downstairs and grabbed a branch!). From there, it was only a matter of wrapping the little presents and hanging them from the branch. It doesn't get any simpler than that (although it could get a little prettier haha). I'm certain Tommy will enjoy it as much as I am, and hopefully this can be something that we do every year.

Here's to hoping that your holidays are filled with laughter, love, compassion, smiles and lots of yummy yummy food!
Do you have any special plans for the holidays?  what is the most meaningful holiday tradition you have?


Friday, November 1, 2013

Lipspiration

Dark lips are perfect for fall; they send a message that you are confident, sexy and not afraid to go out of your comfort zone. However, I might still be a little too traditional to go all vamp and wear a deep plum or wine lip color. But a deep red or oxblood I will wear. This trend is also perfect for the holiday season approaching. Don't be too safe this year and try it!

Pixiwoo has a wonderful tutorial here, where she pairs red lips with soft eye makeup, creating a lovely look that you can easily recreate.

Here is a collection of some amazing looks with red and oxblood lips I found floating around the internet:

Image from Vogue.co.uk
Image from Lucky Magazine
Image from Rebloggy
Image from Jada Beauty
Image from Mase TV
Image from The Budget Fashionista


If you notice, none of these looks have dramatic eyes. The lips truly are the stars of the show, so let them shine and wear subtle eye makeup to complement them, not compete against them.


Tuesday, October 1, 2013

Beauty Trend: Ombre Lips

By now, we have seen everything there is to ombre hair. We have seen it on all celebrities, from Gwyneth Paltrow to Jessica Alba; we have seen all sorts of combinations, from blonde transitioning into pink, to brown transitioning into orange and everything in between.

Now, the time has come to move on, and sure enough, the ombre lips trend is here to stay. Dare I say it? people are being a lot more creative with their lips than they ever were with their hair, and it's pretty understandable: you went a little bit too over the top with your lips? one or two makeup removing wipes and the problem is gone. With your hair? not so much!

To help you stay on top of this trend, I have compiled a list of different kinds of ombre lips. There is one for every kind of girl!

1. For the safe one:
If you are more of a comfort-zone kind of girl when it comes to makeup, this look is for you. Just outline your lips with a lipstick that is the same color but one shade darker than the one on the rest of the lips, and blend them. It is not a very dramatic look but it's beautiful and feminine, and has that extra something that will make your lips stand out.
Image by CounterCultureBeauty


2. For the romantic one:
Pink lips with a subtle hint of coral or peach will complement a sweet, flirty look to perfection.
Image by The Model Stage


3. For the bold one:
Trying different bright shades is definitely a task for the brave ones out there. It takes serious skill to
show off different hues on your lips without looking like a clown. This is an example of a successful attempt, and a very sexy one at that:
Image by CounterCultureBeauty


4. For the party girl:
Bright glossy lips are a favorite for party-time. However, stand out by adding a dramatic color around
the center of your mouth, such as gold, silver, bronze, or even black!
Image by Korean Doll


Also, YouTube beauty guru Michelle Phan did an amazing tutorial on her YouTube channel for the perfect ombre lips for the season, so make sure to check that one out!

Which ombre lips do you like best? Are you going to try it/have you tried it? Comment below!


Related Posts Plugin for WordPress, Blogger...